TextField는 다음과 같이 지정한다.
final로 TextEditingController()를 생성하고,
controller에 지정한다.
ElevatedButton에서 TextEditingController에서 받아온 텍스트를 print 로 출력한다.
1
2
3
4
5
6
7
8
9
10
11
12
13
14
15
16
17
18
19
20
21
22
class MyTextField extends StatelessWidget {
  MyTextField({Key? key}) : super(key: key);
  final myTextController = TextEditingController();

  @override
  Widget build(BuildContext context) {
    return Scaffold(
      body: Row(
        children: [
          TextField(
            style: const TextStyle(fontSize: 20),
            textAlign: TextAlign.left,
            controller: myTextController,
          ),
          ElevatedButton(onPressed: () {
            print (myTextController.text);
          }, child: const Text("print!"))
        ]
      )
    );
  }
}
그런데 이 코드, 실행하면 에러가 난다. 그럴 수밖에 없는 것이 그냥 아무것도 지정해주지 않고 텍스트박스를 만들라고 하면 크기와 너비가 무한대로 설정된 텍스트 박스가 만들어지게 되는 것이다.
결국 우리가 이걸 쓰려면 Container 또는 SizedBox를 통해 외부를 감싸야만 한다.
1
2
3
4
5
6
7
8
9
10
11
12
13
14
15
16
17
18
19
20
21
22
23
24
25
26
class MyTextField extends StatelessWidget {
  MyTextField({Key? key}) : super(key: key);
  final myTextController = TextEditingController();

  @override
  Widget build(BuildContext context) {
    return Scaffold(
      body: Row(
          children: [
            Container(
              width: 400,
              height: 100,
              child: TextField(
                style: const TextStyle(fontSize: 20),
                textAlign: TextAlign.left,
                controller: myTextController,
              ),
            ),
            ElevatedButton(onPressed: () {
              print (myTextController.text);
            }, child: const Text("print!"))
          ]
        )
    );
  }
}
decoration 속성의 InputDecoration을 쓰면 텍스트필드를 마음껏 꾸밀 수 있다.
아래 사진을 참고하자.
1
2
3
4
5
6
7
8
9
10
11
12
13
14
15
16
17
18
19
20
21
22
23
24
25
26
27
28
29
30
31
@override
Widget build(BuildContext context) {
  return Scaffold(
      body: Row(
          children: [
            Container(
              width: 400,
              height: 100,
              child: TextField(
                  maxLength: 150,
                  maxLines: 10,
                  style: const TextStyle(fontSize: 20),
                  textAlign: TextAlign.left,
                  controller: myTextController,
                  decoration: InputDecoration(
                    labelText: "입력!",
                    prefixIcon: const Icon(Icons.text_fields),
                    border: const OutlineInputBorder(),
                    counterText: "${150 - txtCount}자 남았습니다.",
                    errorMaxLines: 150,
                    errorText: "150자까지만 가능합니다.",
                  )
              ),
            ),
            ElevatedButton(onPressed: () {
              print (myTextController.text);
            }, child: const Text("출력"))
          ]
      )
  );
}
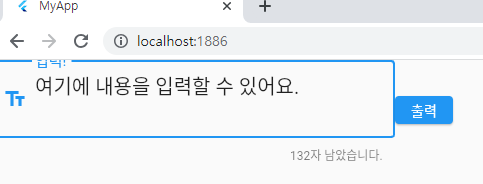
이 코드는 Stateful에서 동작하는 코드다. 왜 Stateful이냐 하면, txtCount는 시시각각으로 변하기 때문이다. 사진에서 132자 남았습니다. 하고 뜨는 부분이다.
https://github.com/shechren/DIM/tree/master/Do5
전체 코드는 위에 있다.